

Taking a camera into the water changes your perspective completely. Instead of looking down at ducks and grebes from the bank, you meet them at eye level, sharing their viewpoint and observing behaviour at close range with less disturbance.
That shift in angle also changes the images themselves. Light from the subject and background reflects across the water’s surface when viewed from below the critical angle set by the different refractive indices of air and water. The result is a simplified frame: foregrounds and backgrounds blur into soft washes of colour, while attention is drawn more strongly to the subject.
Working in the water, however, is not the same as working on land. You’re handling heavy, fragile gear in unstable conditions with limited mobility. Careful planning and foresight are essential. This guide sets out methods for photographers who want to approach water-level bird photography seriously and use it as a reliable technique rather than an occasional experiment.
Planning
The work starts before you pick up a camera. There is no point waiting in a spot which has issues, for example:
Great background but no birds
Birds present but poor light or busy background
Water too shallow/deep
Goal Identification
Decide what you’re aiming for before you do anything else. Are you trying to photograph a particular species, capture a certain type of shot (take-off sequences, reflection portraits, behavioural close-ups, backlit, high key), or some combination of objectives?
Being clear about your goals helps with planning, but it also supports rapid decision making in the field. For example, are you more interested in recording unusual behaviour in a common species, or securing a clean portrait of something rarer? Those split-second choices are easier if you already know your priorities.
Your goals also influence where you set up. Rails and crakes demand a different approach than ducks posed on open water, and action sequences need more space and light than static portraits. The same applies to equipment - the lens, support, and even clothing you choose will depend on the type of shot you’re after.
It’s also far easier to focus your location research and fieldcraft when you have clear objectives.
Species and Habitat Research
Species and Habitat Research
Before you choose where to go, it helps to decide what species you want to photograph. Start with the species. Use a field guide to learn what might be possible in your region. Then work out what habitats those species depend on.
Rails and crakes are a good example: if you want to target them, you’ll need wetlands with dense reedbeds, muddy margins, and quiet backwaters. They often feed at the interface between cover and open ground, rarely straying far from cover. Grebes typically require stretches of open water deep enough for diving, but still prefer vegetation nearby for nesting and cover. Dabbling ducks need shallow areas where they can tip up and feed from the bottom, while diving ducks choose deeper pools. Herons, cormorants, and darters need perches - often prominent logs or branches that give them a vantage point over both prey and predators.

The competitive exclusion principle in ecology provides some useful shortcuts. The idea is that no two species can occupy the same ecological niche indefinitely. This is why wetlands often appear crowded, but there is structure in the way species overlap: coots uproot submerged plants and forage underwater, while moorhens work along the edges. Crakes and rails may share a reedbed, but one species might work right at the waterline while the other prefers slightly drier areas margins. Recognising these divisions helps predict not just where your target will be, but also what might show up along side it.
By starting with the species you want, then working outward to their habitats and how those habitats change with conditions, you avoid the trap of picking a wetland simply because it looks picturesque. Doing this homework gives you a working map before you step into the water, so when you're in the field, you’re heading straight for the zones with the highest chance of the encounter you wanted.
Location Research
Once you know your goals and the species and habitats you’re aiming for, the next step is to identify locations that offer them. This is where online records, local knowledge, and field reconnaissance come together.
Resources like eBird, iNaturalist, social media, or even word of mouth are useful starting points. They don’t just show if a species is present — they often indicate when and how often it has been observed. But be aware of a bias: people tend to visit places where interesting birds have already been reported, which leads to more checklists from those sites while other wetlands go underreported. An absence of records doesn’t mean an absence of birds.

On-the-ground reconnaissance helps balance this. Before committing to wading in, walk the perimeter or nearby paths. Listen for calls, scan for feeding signs, and watch where birds flush and land. Pay particular attention to pinch points - places like narrow reed channels, culverts, or shrinking pools where birds are funneled together. These spots concentrate activity and often deliver more opportunities with less waiting.
By layering online resources with local knowledge and your own field observations, you can narrow down the best sites and improve the odds of achieving the shots you set out for.
Timing and Conditions
Timing and Conditions
Once you know where to go, the next question is when. Light matters, but so does bird behaviour. The two often work together to decide whether a session is productive:
- Light and atmosphere. Dawn and dusk usually provide the best light. The low angle adds warmth and reduces glare, and calm morning water often produces cleaner reflections. By mid-morning in warmer weather, heat haze over mudflats or shallows can make long-lens shots unusable. Wind also shapes your opportunities: birds typically take off and land into the wind, so positioning yourself on the windward side improves your chances of head-on flight shots. Cloud, fog, or shifting conditions can transform the mood of an image but also limit shutter speed.
- Bird activity. Many species follow daily routines. Ducks feed actively at dawn and dusk, then loaf quietly through the middle of the day. Rails and crakes often call and move at first and last light, becoming elusive when the sun is high. Grebes dive in predictable circuits throughout the day, but low angles of light make their surfaces and bubbles easier to track. Knowing these rhythms helps you decide whether to move or wait.
- Season and water levels. Seasonal cycles matter as much as daily ones. Shrinking wetlands concentrate birds, while rising water disperses them. Breeding season often makes species more visible as they patrol territories, while non-breeding birds may retreat into cover. In regions with variable rainfall, the same wetland can swing from packed with birds to silent and dry in a few weeks.
In short: don’t just think about when the light is good. Factor in daily activity cycles, seasonal changes, and water levels. The best timing is when the conditions and the behaviour line up.
Gear and equipment
Clothing
Clothing
To spend long periods in the water without becoming uncomfortable, you need to choose clothing carefully. The best option depends on temperature, depth, and how long you expect to stay in. A few main approaches cover most situations:
- Bathers / swimmers. In warm conditions, the simplest choice is often best. Quick-drying shorts and a rash top provide freedom of movement and UV protection. Avoid cotton, which becomes heavy and clammy when waterlogged.
- Waders. Waders are a practical option for shallow wetlands, keeping you dry and adding protection. Neoprene models insulate in cooler water, and integrated boots are convenient. The limitation is depth: once water overtops them, they flood and quickly become hazardous. Waders are only suitable if you know you won’t need to venture too deep.
- Wetsuits. A wetsuit won’t keep you dry, but it provides insulation by trapping a layer of water against your skin. They’re useful for chest-deep water and prolonged sessions, though less convenient and less breathable than waders.
- Drysuits. Drysuits completely seal you off from the water and are the safest option in very cold conditions. They allow you to wear insulating layers underneath and are the best choice when hypothermia is a real risk, though they are bulkier and more expensive.
- Footwear. Always pair your clothing choice with appropriate footwear. Sturdy water shoes or wader boots protect your feet from sharp objects, rocks, or leeches and add insulation in cooler conditions.
Aside from your choice of clothing it's also worth thinking about insect repellant, hydration, UV protection. and protection from abrasion. Consider long sleeves, a wide-brim hat, and suitable gloves. For concealment, consider camouflage patterns on the parts of your clothing that remain above the waterline. Finally, always plan for after the session. Keep spare clothes and a towel in your car.
Camera support and handling
Keeping your camera stable at water level is one of the biggest challenges. Every option involves trade-offs in mobility, control, and risk management:
- Handholding is the simplest method, but also the riskiest. Holding several kilograms of fragile gear while wading leaves you vulnerable to slips, sudden sinks into mud, fatigue, or loss of balance. Even if you stay upright, arms tire quickly and long lenses are difficult to keep steady. Handholding is only realistic for brief encounters in shallow water, and even then it leaves little margin for error.

- Monopods are a better choice than hand holding - it eases fatigue by supporting the camera’s weight while remaining reasonably mobile. You can brace the base against the bottom or a board for extra steadiness. But they don’t protect you from slips or falls, and they’re never hands-free - you've got to keep holding on at all times. Exposure to water also can also creates maintenance issues: salt or dirty water in the locks, corrosion of fittings, and extra cleaning after each session. A monopod set too low can even dip your camera dangerously close to the surface if the bottom is soft or uneven.
- Tripods offer more stability and the ability to go hands free, but they are more difficult to handle in the water than monopods because they more easily snag on submerged objects. Like monopods, use in water can cause corrosion and can trigger a need for maintenance.
- Floating hide photography is the most effective solution. By fixing your tripod head to a buoyant, stable object, the hide carries the weight while you focus on movement and positioning. This reduces fatigue, minimises the risk of dropping gear, and gives you a smooth, eye-level perspective on your subject.
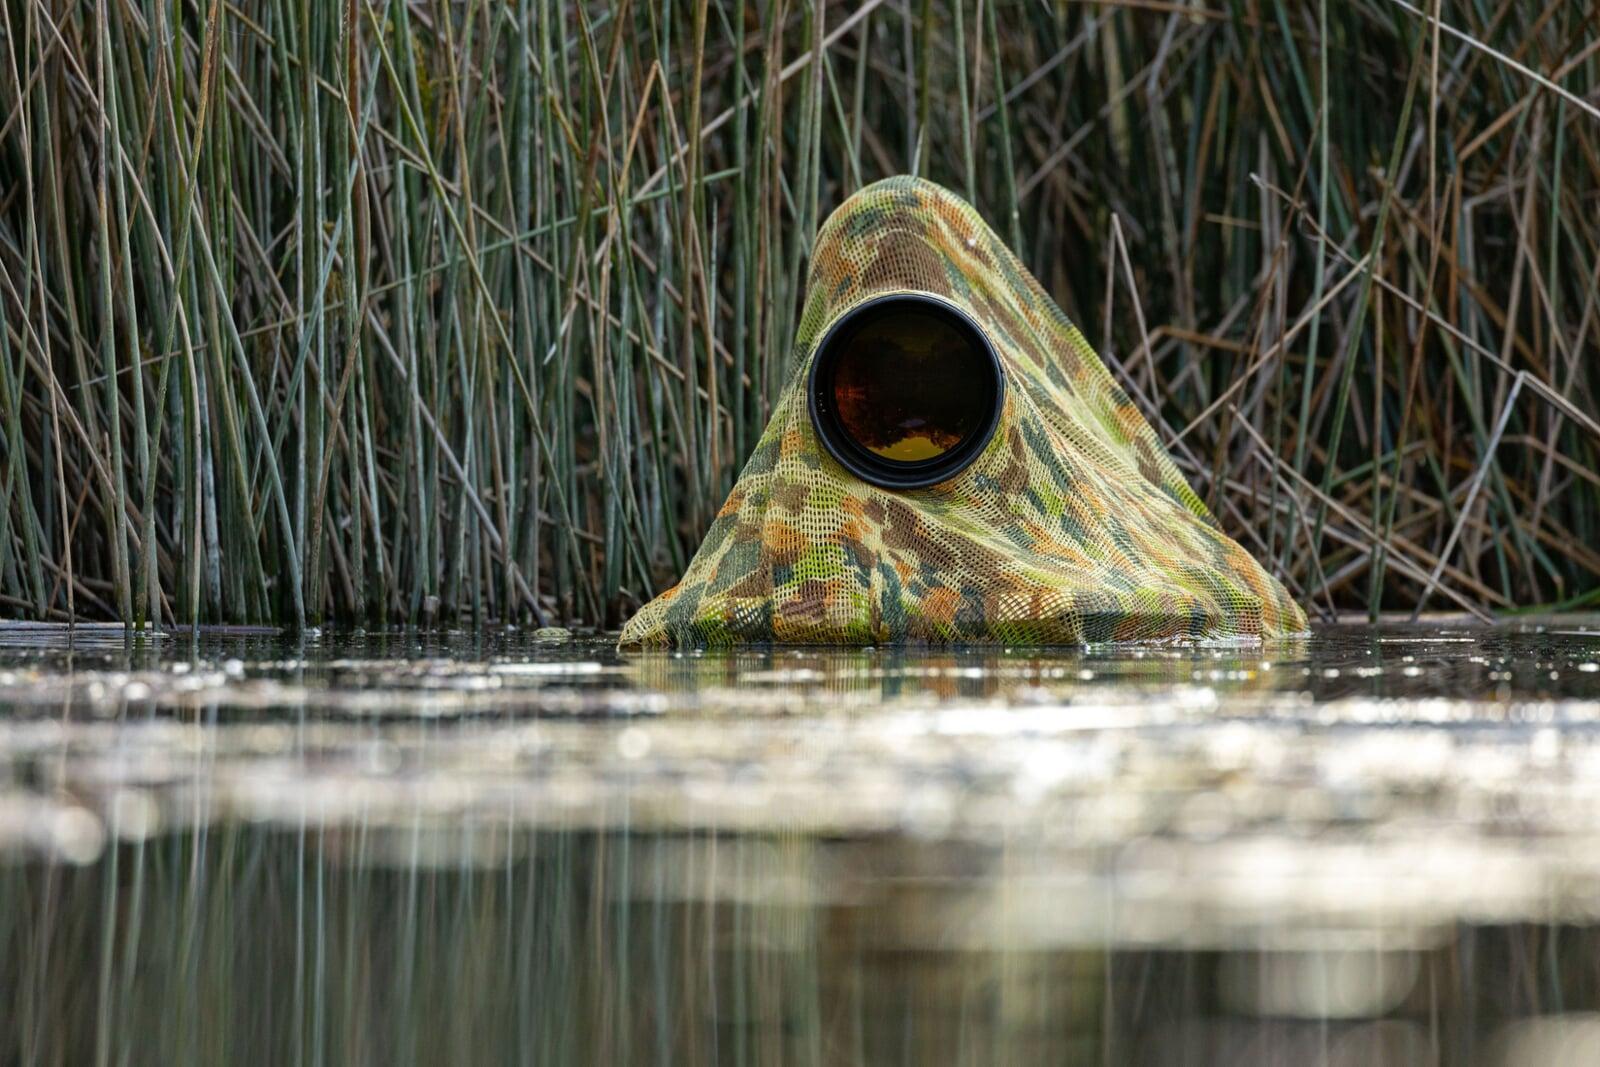
Commercial and DIY solutions exist, but one of the simplest and most affordable is the HydroBlind Mount, which converts a bodyboard into a stable floating platform. The board supports your tripod head and lens at water level, secured with straps and tie-points, while you push or guide it. Paired with camouflage netting, it keeps your gear stable, reduces disturbance, and frees you to concentrate on the bird rather than not dunking your equipment.
Camera and other equipment
Generally speaking, you need to make the right camera equipment choice before getting into the water - it's not generally practical to be changing lenses or equipment whilst floating around. As far as camera bodies, lenses and teleconverters the tradeoffs are similar to on land. The method of supporting your camera may also impact your decision in terms of what gear to use - it's easy to support a large prime lens on floating setup but pretty difficult if you're trying to spend an hour in the water handholding. Match your setup to your method of support and the conditions you expect.
It's worth thinking about rain/splash protection, and making sure you have a charged battery and a big card for lots of photos - it's generally not a good idea to change those things out on the water. It's also worth having a plan to secure essentials like your phone and keys so they don’t get lost or water-damaged. A drybag clipped to your gear is a reliable solution - the HydroBlind includes tether points for this.
Technique
Once you’ve done the planning and set up your gear, the difference between coming home with average shots or unique frames often comes down to technique. Working at water level requires you to rethink how you move, position yourself, and compose your images.
Concealment and Movement
Your profile is already lower in the water, but birds are still sensitive to movement, colour, and sound. Wear neutral or camouflage tones above the waterline, and if you are floating your camera in the water, use camouflage materials to break up its outline. Movement should be slow and deliberate: glide forward in small increments, then pause to let birds settle. Avoid splashes or jerky motions - even distant birds notice. Keep your silhouette broken up and low, and remember that sound carries far over water, so control noise. Common mistakes:
Rushing the approach. Moving too quickly almost always pushes birds further away and causes stress. For very shy birds it may be best not to approach them at all.
Standing upright. Nothing spooks waterbirds faster than a tall silhouette looming from the water. If the water is shallow then crouch or kneel.
Ignoring conditions. Heat haze or harsh light can ruin photos - know when to give up for the day.
Over-reliance on focal length. Zooming in too far can crop out context, exacerbate haze and exaggerate shake; it's better to use the right techniques to get close, and sometimes a shorter focal length can tell a better story anyway.
Shooting and Composition
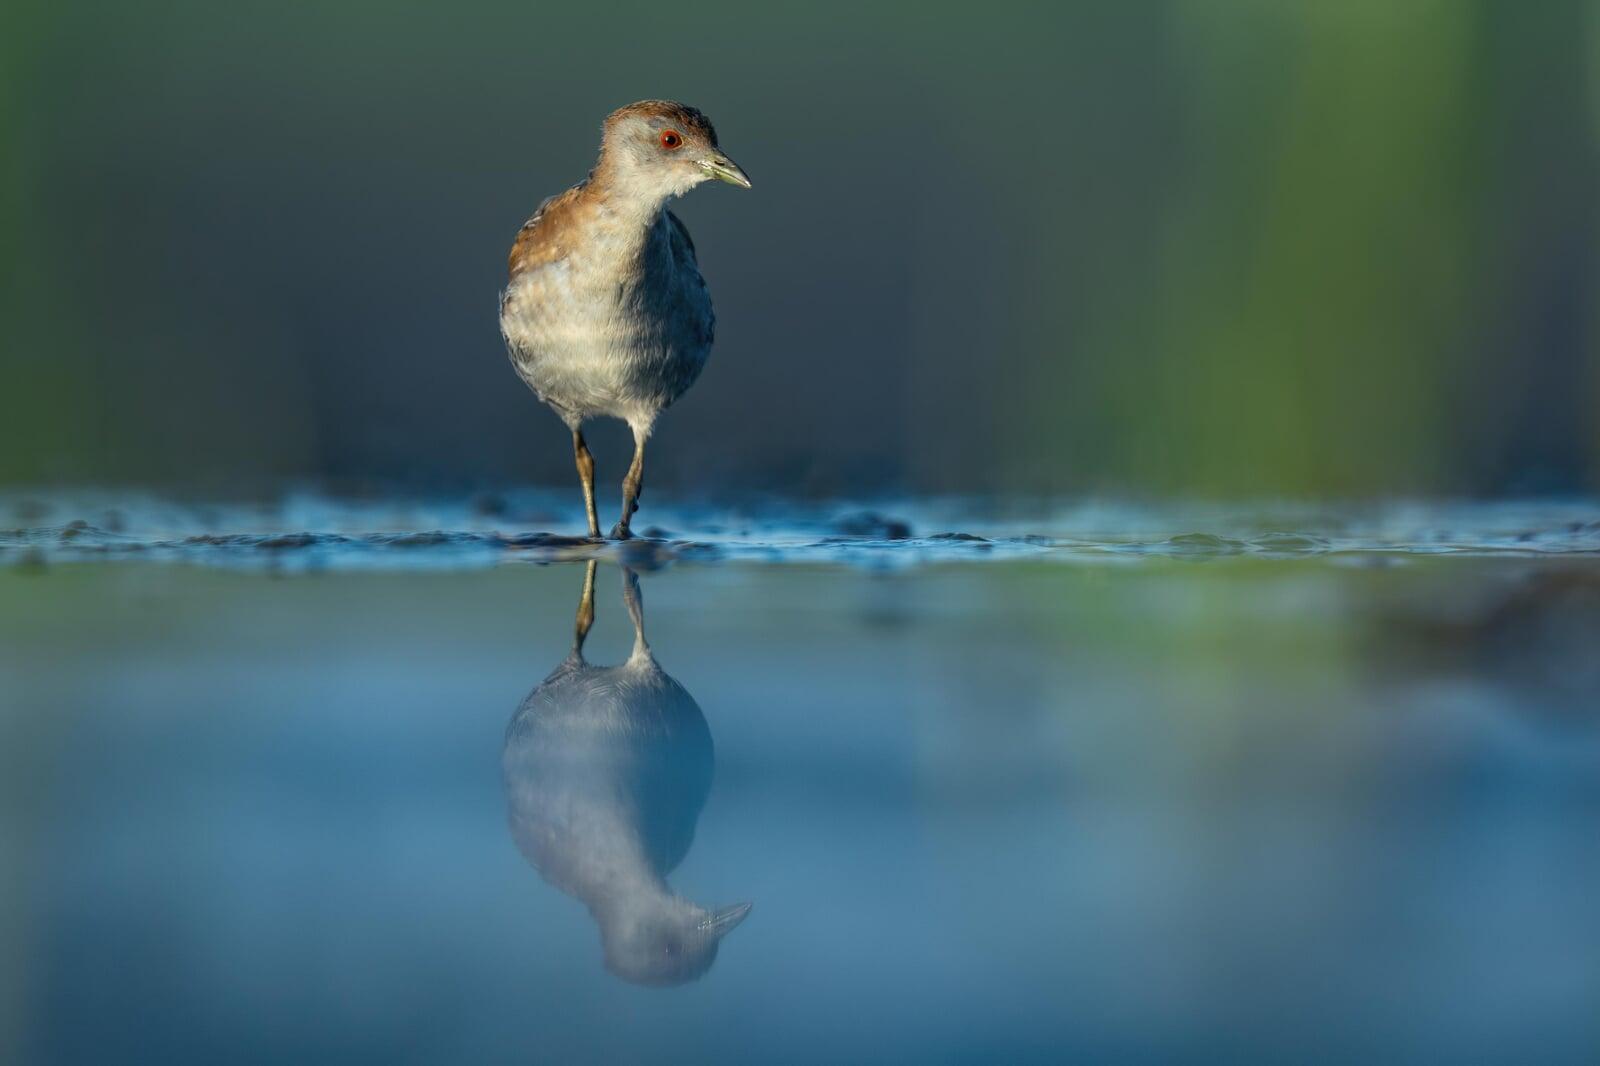
At water level, composition changes dramatically. The surface itself becomes part of the image, offering reflections, blurred foregrounds, and soft transitions you can’t get from the bank. Use these elements deliberately rather than treating them as background noise.
When working with reflections, aim for symmetry by keeping the horizon straight and leaving space below the subject. Foreground blur from reeds, ripples, or floating vegetation can add depth, but make sure it frames the bird rather without obscuring it.
Think about movement in the frame. Leave space in front of a swimming bird or one about to take off, so the action doesn’t feel cramped. At the same time, don’t overlook wider shots. Showing a bird in context, framed by reeds, mirrored in calm water, or lit by unusual weather, often tells a stronger story than a tight headshot.
Cluttered frames: Reeds, sticks, or floating debris crossing the subject can kill a photo’s impact. Use positioning and depth of field to simplify.
Chopped reflections: If you include a reflection, commit to it. Cutting it off halfway or at an awkward point looks accidental.
Tilted horizons: Waterlines draw the eye - a sloping horizon is immediately obvious and distracting.
Crowded subjects: Placing a bird too close to the edge of the frame, especially if it’s moving that way, makes the shot feel cramped.
Overexposed highlights: Sunlight bouncing off water can easily blow out whites in plumage or reflections. Watch your histogram and use exposure compensation if needed.
Context ignored: Tight crops may show detail but often strip away the setting that gives the image atmosphere and narrative.
Final Thoughts
Final Thoughts
Photographing birds from the water isn’t the easiest path, but it opens up perspectives that can’t be matched from the bank. Meeting a grebe at eye level, or catching a rail as it slips across a channel, gives both intimacy and context that ground-based photography often misses and is an exciting experience to boot.
Success depends less on luck than on preparation: understanding species and habitats, choosing the right location and timing, managing clothing and gear, and moving with patience and purpose. The techniques take practice, but the rewards are worth the effort.
Start small: work shallow edges with common species, refine your fieldcraft, and gradually take on more ambitious targets. Over time, you’ll build not only a portfolio of unique images but also a deeper connection with the wetlands themselves.